One of the things I’ve always wanted to do was to be able to load data from a page into a Gravity Form so that instead of having to make multiple forms, you can have one form and just load content from the page. That makes both the form and consolidating data far simpler.
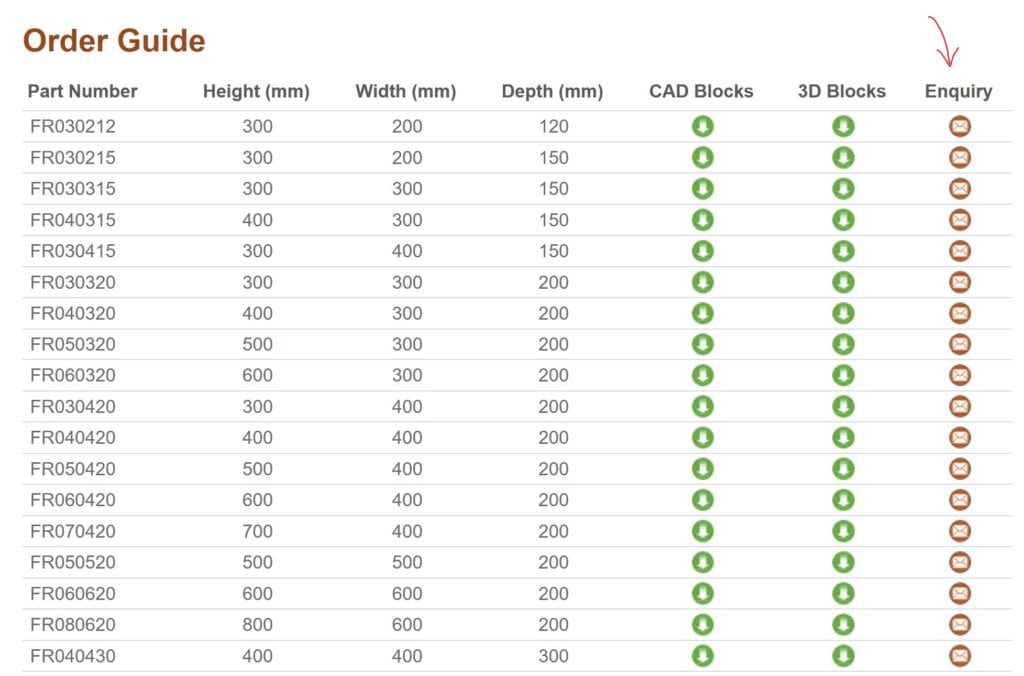
The type of forms this is good for include enquiry forms where there are lots of products on a page and perhaps accessories too. In the case I was looking at, the site had over 100 product groups, each with multiple products and accessory ranges. In the past, we had used separate forms for the popular products and loaded them in a modal box after clicking an icon in the product table: –

This obviously meant that each form had to be individual and created with all the products and accessories. That’s a lot of work to both create and manage.
The new approach is a single Gravity Form that dynamically loads in both the product and the accessories, so the form is less complex and a single form can cover all products.
NOTE: Before you go any further, this will not work well if your product needs conditional logic to say match an accessory with the product. Once you start adding in conditional logic like that, the form starts to get very confusing, very quickly. Instead if you do need to do that you can clone the form and add your conditional logic to the new form only.
The particular site I was looking at used 2 approaches to collect the data need for the form. One method was to just read the data from the page using jQuery, the other method extracted the accessories from a variable in PHP. For a standard WordPress installation, probably the first method is what you would want to go with. The second method was just easier!
Read Gravity Forms Article
The place to start is reading Gravity Forms article on this subject as https://docs.gravityforms.com/using-dynamic-population/ and https://docs.gravityforms.com/gform_pre_render/.
The first technique we are going to use just simply extracts the part number from the table line that has been clicked and therefore only uses the first of those Gravity Forms posts.
Extracting Page Data From Clicked Line
Step 1
Firstly I need to set the scene of this particular application. The product tables are stored in tablepress and in this case the form opening is initiated using a fancybox modal box. Therefore in a table similar to the above, in the theme page template, we would have a link in the table cell such as: –
<a href="#fancyboxID-3" class="fancybox table-enquiry-buttons"></a>So in the above, we are linking to the fancyboxID-3, which is added into the page and the classes add the button background image etc. The fancyboxID-3 is further done the page and is something like:
	<div style="display:none" class="fancybox-hidden">
		<div id="fancyboxID-3" class="hentry" style="width: 680px; max-width: 100%;">
			<h2>Product Enquiry</h2>
			<?php gravity_form(32,false,false,false,'',true,80); ?>
		</div>
	</div>
You can see that the first div hides this form, the second div sets the id and some dimensions and the form is added using php.
I used this method mostly because this was the method we were using anyway, but note the important point, the form loads AFTER the click on the page. I am not sure how this would work if the form loads before the click.
Step 2
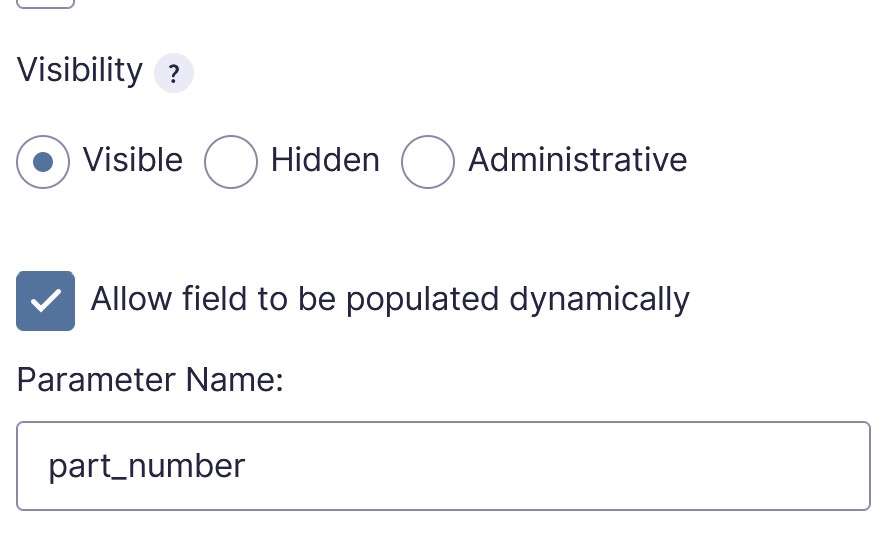
Once you have your form set up on the page and have built your form in Gravity Forms, the important thing to do is on the field where you want your page-loaded-data to show, you need to enable dynamic population. You do this by selecting the field, then in the sidebar, Advanced section, check “Allow Field to be Populated Dynamically”, then add your parameter name, which you can select. In my case I have called it “part_number”.
Step 3
So you are now all setup for some jQuery. There are various ways to add jQuery or javascript in general to the page. These include via a custom plugin or via javascript being loaded into the page elsewhere. I’m not going to cover enqueuing scripts here, but there are plenty of articles on how to do this.
In my case I actually had a few scripts already enqueued on this page, so I added my jQuery code to that.
The code to add is as follows: –
// This section adds the part number clicked on into the enquiry form
// Get part number from product table row click
jQuery('table.product tr').click(function() {
  var partno = jQuery(this).children('td:first-child').text();
  jQuery('#input_32_29').val(partno);
});
To Change
The first line of the code is to detect the click in the table row (note the form only shows on clicking the enquiry icon). In my case the table has a class of product hence “table.product.tr” if you have any other classes on your table, you can change that accordingly.
The second line of code sets the text you are going to extract from the line. In my case it’s the first table cell, so hence “td:first-child”.
Lastly the third line, the “#input_32_39” is the cell id of my particular form. You get this data from the form number (first number) and the second number (cell number) in Gravity Forms. You will need to change those to your particular form and cell number.
Note that you don’t seem to need to have the same value that you specified in Gravity forms as your parameter name. In my case I just have partno.
After these steps your form should automatically load the part number from the table line you clicked on.
Extracting Data from a variable in WordPress
This next section is a bit more complicated! We are going to extract data from am array in php and populate a multiselect field (you could do checkboxes instead) with any accessories that are listed by displaying this variable on the page. This relates more to the second Gravity Forms article above.
Note that this is populated into the form as the page is built, so doesn’t require settings in Gravity Forms itself. Note that this code is in the theme template file.
/ Start of section to add accessories to the intable non-specific form
		add_filter( 'gform_pre_render_32', 'populate_accessories' );
		add_filter( 'gform_pre_validation_32', 'populate_accessories' );
		add_filter( 'gform_pre_submission_filter_32', 'populate_accessories' );
		add_filter( 'gform_admin_pre_render_32', 'populate_accessories' );
		function populate_accessories( $form ) {
			foreach ( $form['fields'] as &$field ){
				if ( $field->type != 'multiselect' || strpos( $field->cssClass, 'populate-accessories' ) === false ) {
					continue;
				}

				global $tab_4_content1;
				$choices = array();
				$accextracts = array();


				$dom = new DOMDocument;
				$dom->loadHTML($tab_4_content1);
				foreach($dom->getElementsByTagName('li') as $node)
				{
					$accextracts[] = $dom->saveHTML($node);
				}

				if (empty($accextracts)) {
					echo "<style>li#field_32_30{display:none !important;}</style>";
				  }


				// Create the array from the line items in here. Save them into $choices created above
				foreach ($accextracts as $accextract) {
					$final = strip_tags($accextract);
					$choices[] = array(
						'text' => $final,
						'value' => $final
					);
				}

				// update 'Select a Post' to whatever you'd like the instructive option to be
				$field->placeholder = 'Optional Accessories';
				$field->choices = $choices;

			}
			return $form;
		}
// End of section to add accessories to the intable non-specific form
I can’t pretend to follow all this code however, the following needs changing for your installation: –
add_filter( 'gform_pre_render_32', 'populate_accessories' );
add_filter( 'gform_pre_validation_32', 'populate_accessories' );
add_filter( 'gform_pre_submission_filter_32', 'populate_accessories' );
add_filter( 'gform_admin_pre_render_32', 'populate_accessories' );
This section includes the Gravity Forms ID. In my case this was 32, but you will need to add your form in.
if ( $field->type != 'multiselect' || strpos( $field->cssClass, 'populate-accessories' ) === false ) {
		continue;
			}
This section identifies the field you are going populate in the form. In my case it’s the multiselect field. NOTE that you need to pick a field type that isn’t used elsewhere on the form, otherwise it will fill all multiselects on the form and you’ll need to find another way to identify it. Essentially though this code is saying run this code only in that multiselect field.
global $tab_4_content1;
	$choices = array();
	$accextracts = array();

	$dom = new DOMDocument;
	$dom->loadHTML($tab_4_content1);
	foreach($dom->getElementsByTagName('li') as $node)
		{
			$accextracts[] = $dom->saveHTML($node);
		}

if (empty($accextracts)) {
	echo "<style>li#field_32_30{display:none !important;}</style>";
			}
// Create the array from the line items in here. Save them into $choices created above
		foreach ($accextracts as $accextract) {
			$final = strip_tags($accextract);
			$choices[] = array(
				'text' => $final,
				'value' => $final
			);
		}
In this section we are extracting the $tab_4_content1 variable already loaded into php. In this case this contains an unordered list of the product accessories. You can see in this section I am extracting these elements. This may not be appropriate to your variable so I won’t go into that here.
// update 'Select a Post' to whatever you'd like the instructive option to be
		$field->placeholder = 'Optional Accessories';
		$field->choices = $choices;
			}
			return $form;
		}
This last section updates the placeholder etc and returns the form.
Result
You can see the result at https://www.brenclosures.com.au/products/ausrack-txd/. Click on the orange enquiry icons in the table to load the form. You will see that the product number of the line you click on is loaded as the Enclosure Selection and Accessories Available is filled with the accessories available in the accessories section on the page.
Note not all of the forms on this site use this system.


